Top 10 Ways to Adjust Your Bike Seat to Avoid Knee Pain?

Time:2026-10-06 Author:Madeline
0%

Knee pain can turn a pleasant bike ride into a slow, frustrating struggle. A seat positioned only a few millimeters too high may force your hips to rock, while a low seat can keep your knees sharply bent. These small changes affect pedaling efficiency, joint comfort, and confidence on the road.

This guide answers the practical question, “How to adjust my bike seat to avoid knee pain?” It explains saddle height, fore-and-aft position, tilt, and riding posture in clear steps. You will also learn how to notice warning signs, such as pain behind the knee, soreness around the kneecap, or pressure on one side. A simple starting point is useful. However, no single measurement suits every rider, bicycle, or leg length.

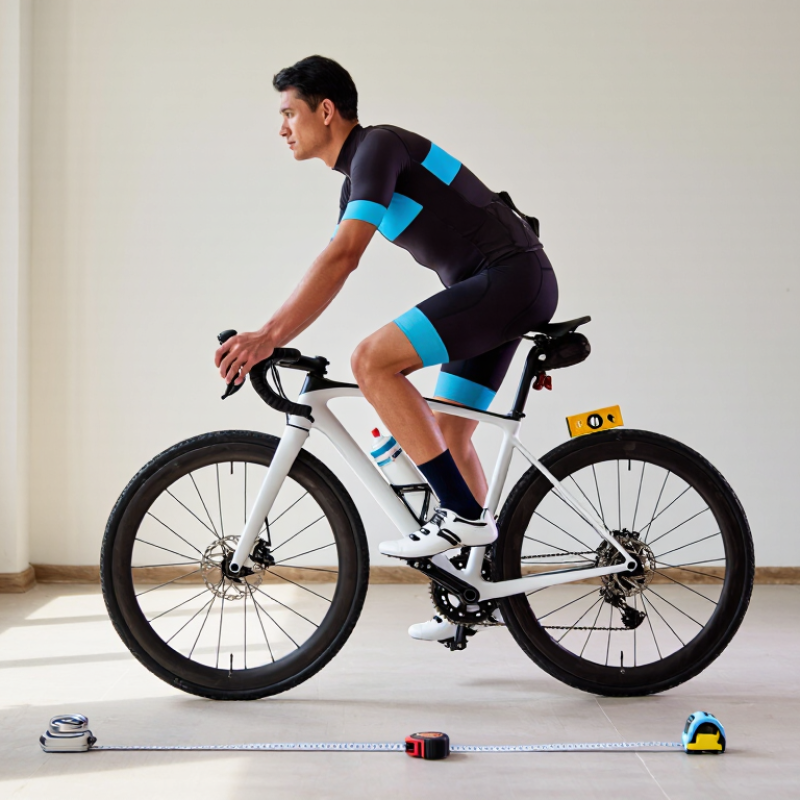
Use a wall, a level floor, and a small measuring tape when checking your position. Your knee should remain slightly bent when the pedal reaches its lowest point. The adjustment should feel stable, not forced. Make one change at a time, then test it during a short, easy ride. Five millimeters can matter.

Professional bike fitting can provide greater accuracy, especially after an injury or when pain continues. Medical advice may also be necessary. I should acknowledge one practical weakness: seat position alone cannot solve every knee problem. Cleat alignment, riding intensity, muscle weakness, and worn equipment may contribute. Listen to your body, record each adjustment, and avoid pushing through sharp pain. The goal is not a perfect-looking setup. It is smoother movement and dependable comfort.
Top 10 Ways to Adjust Your Bike Seat to Avoid Knee Pain?

Identify the Correct Saddle Height for Comfortable Knee Extension

Top 10 Ways to Adjust Your Bike Seat to Avoid Knee Pain

Identify the Correct Saddle Height for Comfortable Knee Extension

Saddle height strongly affects knee comfort, pedaling control, and cycling efficiency. A seat that sits too low keeps your knee overly bent. This can create pressure around the front of the knee. A seat that sits too high may cause hip rocking and strain behind the knee.

A practical starting point is to place your heel on the pedal. Rotate the crank backward until the pedal reaches its lowest position. Your leg should almost straighten without your pelvis moving. Then, wear your usual cycling shoes and test the position with the ball of your foot over the pedal. Your knee should remain slightly bent during normal pedaling, usually around 25 to 35 degrees. This range is useful, but it is not a rigid rule.

Small changes matter. Raise or lower the saddle by 3 to 5 millimeters. Ride for several minutes and notice your knee movement. If your hips sway, the saddle may be too high. If your knees feel cramped, it may be too low. I once adjusted a seat by nearly a centimeter, then realized the rider’s shoes had different sole thicknesses. That mistake was avoidable.

Tips: Mark the seat post before testing changes. Check both knees, not just the painful one. Persistent pain deserves assessment from a qualified medical or cycling professional. Comfort should guide the final adjustment.

Top 10 Ways to Adjust Your Bike Seat to Avoid Knee Pain

Identify the correct saddle height for comfortable knee extension.

How to read the chart

Knee flexion is measured at the bottom of the pedal stroke. A commonly used bike-fit reference is approximately 25°–35° of knee flexion. Angles below this range may indicate that the saddle is too high, while angles above it may indicate that the saddle is too low. Individual anatomy, flexibility, footwear, and riding style should also be considered.

10 practical saddle adjustments

  1. Measure saddle height from the center of the bottom bracket to the top of the saddle.
  2. Start with a knee-flexion target of approximately 25°–35° at the bottom of the stroke.
  3. Lower the saddle slightly if your hips rock from side to side while pedaling.
  4. Raise the saddle slightly if your knee remains excessively bent at the bottom of the stroke.
  5. Make small changes of about 2–3 mm at a time.
  6. Keep the saddle level unless a qualified fitter recommends another angle.
  7. Check saddle fore-aft position so the knee is not forced too far forward or backward.
  8. Recheck the position while wearing your normal cycling shoes and using your usual pedals.
  9. Test the adjustment during an easy ride before using it for long or intense sessions.
  10. Stop riding and seek professional assessment if pain persists, worsens, or causes swelling.

Set the Saddle Position to Align Your Knees and Pedals

A well-positioned saddle helps your knees move smoothly over the pedals. Begin with saddle height. Place your heel on the pedal and rotate it to the lowest point. Your leg should nearly straighten without your hips rocking. Replace your normal foot position and check for a slight knee bend, usually around 25–35 degrees. Small changes matter.

At the three-o’clock pedal position, your kneecap should sit roughly above the pedal spindle. This fore-aft relationship is only a starting point, not a universal rule. Move the saddle forward or backward by 3–5 millimeters, then test it on a flat, easy ride. Your knee should track forward without drifting sharply inward or outward. Watch yourself from the front, or ask an experienced cyclist to observe your movement.

Keep the saddle level unless a qualified fitter identifies a specific need. A nose tilted too far downward can make you slide forward, increasing pressure around the knees. I once raised my saddle to improve power, but ignored hip rocking and created more discomfort. That mistake changed how I make adjustments. Change one setting at a time, record the measurement, and ride for several minutes before judging it.

Pain that persists, worsens, or causes swelling deserves assessment from a medical professional. Stop there.

Adjust Saddle Tilt and Fore-Aft Position for Better Joint Support

Top 10 Ways to Adjust Your Bike Seat to Avoid Knee Pain?

Saddle tilt and fore-aft position strongly influence knee tracking. A level saddle usually gives stable pelvic support. A nose tilted downward may reduce pressure, but it can push your body forward. Then your knees work harder.

Research in bike-fitting literature commonly recommends 25–35 degrees of knee flexion at the bottom pedal position. This range supports efficient movement without forcing excessive extension.

Move the saddle backward in small steps, such as 3–5 millimetres. This can reduce the feeling of a cramped knee. However, too much setback may increase hip strain.

Place the pedal at three o’clock. Your kneecap should sit roughly above the pedal axle, a traditional reference used in professional fitting. It is only a starting point. Bodies differ.

Tips: Mark the original position first. Adjust one variable at a time. Ride for ten minutes, then reassess. British Cycling guidance also stresses gradual changes and stable hip control. I once lowered a saddle to solve front-knee pain. It helped briefly, but my hips began rocking. That mistake mattered. Pain can reflect cleat position, cadence, or training load, not only saddle height. If discomfort persists, seek assessment from a qualified physiotherapist or bike fitter. Pain is feedback. Do not simply push through it.

Check Pedaling Form, Leg Alignment, and Resistance Settings

Top 10 Ways to Adjust Your Bike Seat to Avoid Knee Pain

Set the seat height so your knee stays slightly bent at the pedal’s lowest point. A nearly straight leg can overload the joint. A low seat may force your knee forward and create pressure around the kneecap. Move the seat forward or backward until your knee sits over the pedal spindle. Make small changes, about three millimeters at a time. Check the seat tilt, too. A level position usually supports stable hip movement, though some riders prefer a slight downward angle.

Watch your pedaling form during each stroke. Keep your knees tracking toward your second toes, rather than drifting inward or outward. Relax your ankles. Push smoothly instead of stomping the pedals. Keep both feet centered, and avoid twisting your hips to reach the bottom position. I sometimes notice poor form only after fatigue begins. That makes short video recordings useful for checking alignment. A coach or physical therapist can provide a more reliable assessment when pain continues.

Use light resistance while adjusting your position. High resistance encourages forceful, slow pedaling and may increase knee strain. Try a comfortable cadence that feels smooth, not rushed. Warm up for several minutes before harder efforts. Stop if you feel sharp pain, swelling, or worsening discomfort. Seat adjustments are not a complete diagnosis. Persistent symptoms deserve professional medical evaluation.

Test Each Adjustment and Fine-Tune Your Riding Position Safely

Top 10 Ways to Adjust Your Bike Seat to Avoid Knee Pain?

Knee pain often reflects several small fit errors, not one dramatic mistake. A 2020 review in Sports Medicine reported lower-limb overuse problems among roughly 30–60% of surveyed cyclists. Test changes carefully. Record saddle height, fore-aft position, tilt, cleat alignment, stance width, handlebar reach, cadence, resistance, pedal smoothness, and pain location. Move the saddle only 2–3 millimetres at a time. A saddle that sits too low may increase knee flexion and front-of-knee stress. Too high can create hip rocking, hamstring tension, and pain behind the knee. Keep your pelvis stable while pedalling.

Ride for 10–15 minutes after each adjustment. Use the same route and similar resistance. Pain that worsens, causes limping, or remains after riding needs professional assessment. Sports medicine guidance supports gradual load changes, because sudden training increases can overload tendons. Do not chase a perfect angle from one measurement. Body proportions differ. My own fitting mistake was raising the saddle repeatedly when the real issue was excessive reach. That was humbling.

Tips: Mark the original position before changing anything. Film your side view at easy effort. Keep your knee tracking toward the second toe. Try a slightly lower gear before changing the fit again. If symptoms persist, consult a qualified bike fitter or clinician. A 2023 professional cycling injury report also emphasized monitoring pain early, rather than riding through it. Small adjustments can feel strange at first. Recheck them after several rides.

Top 10 Ways to Adjust Your Bike Seat to Avoid Knee Pain? — Test Each Adjustment and Fine-Tune Your Riding Position Safely

No. Seat Adjustment Practical Starting Point How to Test It Safely Signs the Position May Be Correct Warning Signs and Fine-Tuning
1 Set the saddle height With the crank at its lowest point, begin with a slight knee bend rather than a fully straight leg. A knee angle of roughly 25–35 degrees at the bottom of the pedal stroke is a commonly used starting range. Adjust in small increments of about 3–5 mm. Ride for several minutes on easy terrain and keep the hips level while pedaling. The leg extends smoothly without forcing the foot to reach for the pedal, and the hips remain stable. A saddle that is too high may cause hip rocking, toe-pointing, or pain behind the knee. A saddle that is too low may increase the feeling of pressure at the front of the knee.
2 Check saddle setback Start with the saddle centered on its rails. When the cranks are level, the kneecap should generally be close to vertically aligned with the pedal axle as a neutral reference, not an absolute rule. Move the saddle backward or forward by 3–5 mm at a time. Test each change on a flat route using the same gear and cadence. Pedaling feels balanced between the front and back of the thighs, with no need to slide forward or stretch toward the handlebars. Too far forward can increase front-of-knee loading. Too far back can create excessive reaching, hamstring tension, or discomfort behind the knee.
3 Level the saddle tilt Begin with the saddle approximately level from nose to tail. Use a small spirit level if available, while recognizing that saddle shape can affect the reading. Make changes of only 1–2 degrees. Ride for 5–10 minutes with relaxed hands and avoid judging the position after only a few pedal strokes. The pelvis feels supported, body weight is distributed comfortably, and the rider does not slide forward or brace heavily through the arms. A nose-down angle may cause sliding and extra hand pressure. A nose-up angle may create pelvic pressure or restrict hip movement.
4 Center the saddle laterally Align the saddle with the bicycle’s centerline and confirm that the seatpost is not visibly twisted. Stand behind the stationary bicycle and check alignment with the top tube, seat tube, and rear wheel. Then ride slowly and observe whether one knee tracks differently. Both legs feel similarly loaded, and the knees track forward without repeatedly drifting inward or outward. A sideways saddle can contribute to uneven hip movement, asymmetrical knee tracking, or one-sided discomfort. Persistent asymmetry may require a professional assessment.
5 Verify saddle stability Confirm that the seatpost, saddle clamp, and adjustment hardware are tightened to the bicycle manufacturer’s specified torque. Before every test ride, hold the saddle and gently check for movement. Stop riding immediately if it shifts, tilts, or makes unusual noises. The saddle remains in exactly the same position throughout the ride, allowing reliable comparison between adjustments. A loose saddle can change knee angles unexpectedly and create a fall risk. Do not exceed the seatpost’s minimum insertion mark.
6 Match saddle height to footwear Set the position while wearing the shoes used most often for cycling. Different sole thicknesses and pedal interfaces can change the effective leg length. If footwear changes, recheck the saddle height and test with an easy 10-minute ride before harder efforts. The same comfortable knee bend is maintained regardless of normal changes in cycling footwear. Thicker soles can effectively reduce knee extension, while thinner soles can increase it. Avoid making large changes without retesting.
7 Check cleat or foot position Place the foot so the pedal spindle is positioned under the ball of the foot as a neutral starting reference. Keep the foot angle natural rather than forcing it straight. Change fore-aft or rotational position in very small increments, then pedal lightly for several minutes. Make only one change at a time. The feet feel supported, the knees track naturally, and there is no pulling or twisting sensation at the knee. A poorly aligned foot position can transfer rotational stress to the knee. Stop if there is sharp pain, numbness, or a sudden change in knee tracking.
8 Use an appropriate saddle width Choose a saddle wide enough to support the sit bones without interfering with leg movement. Width should be based on pelvic support and riding posture, not appearance. Test the saddle on a short, easy ride. Check whether the pelvis remains centered and whether the thighs rub the sides during normal pedaling. The sit bones carry most of the support, the pelvis stays stable, and the thighs move freely. A saddle that is too narrow may reduce pelvic support; one that is too wide may rub the inner thighs or alter knee tracking.
9 Recheck the handlebar reach after seat changes After changing saddle height or setback, reassess whether the torso and arms remain relaxed. The elbows should have a slight bend rather than being locked. Ride on a safe, flat surface and briefly move between normal hand positions. Keep the shoulders relaxed and avoid leaning heavily on the bars. The pelvis remains supported without excessive forward sliding, and the rider can steer without stretching or collapsing the upper body. A saddle moved too far back or too high can increase reach and encourage compensatory hip or knee movement. Address the saddle position before changing other components.
10 Test cadence and riding load After each seat adjustment, test at an easy-to-moderate effort with a comfortable cadence. Many riders reduce knee strain by avoiding very slow, high-force pedaling. Use a flat route, ride for 10–15 minutes, and compare one adjustment at a time. Increase duration and intensity gradually only if symptoms remain absent. The knees move smoothly, breathing and effort are controlled, and discomfort does not increase during or after the ride. Do not use a seat adjustment to push through pain. Stop for sharp, worsening, swollen, or persistent symptoms and seek advice from a qualified medical professional.
Safe testing reminder: Change only one variable at a time, record the measurement before and after each adjustment, and test in a low-traffic area. Mild muscle fatigue can be normal, but persistent or sharp knee pain should not be ignored.

FAQS

How can I find a practical starting saddle height?

Place your heel on the pedal and rotate it to the lowest position. Your leg should almost straighten without pelvic movement. Then use your normal cycling shoes and keep a slight knee bend.

What knee angle usually feels suitable during normal pedaling?

A bend of about 25 to 35 degrees is a useful starting range. It is not a rigid rule. Comfort and smooth movement still matter more.

What signs suggest that my saddle is too low?

Your knees may feel cramped, especially at the front. A low saddle keeps the knee overly bent. The problem may feel obvious after several minutes.

What signs suggest that my saddle is too high?

Your hips may rock from side to side. You may also feel strain behind the knee. Lower the saddle slightly and retest.

How much should I change the saddle height at one time?

Adjust it by only 3 to 5 millimeters. Mark the seat post before testing. Small changes are easier to understand.

How should I position the saddle above the pedals?

At the three-o’clock position, your kneecap should sit roughly above the pedal spindle. Move the saddle forward or backward by 3 to 5 millimeters. This alignment is only a starting point.

Should the saddle remain level?

Usually, yes. A nose tilted too far downward can make you slide forward. That position may increase pressure around the knees.

What mistakes can make saddle adjustment misleading?

Different shoes can have different sole thicknesses. I once changed a saddle by nearly one centimeter and missed that detail. Change one setting at a time, then ride for several minutes.

When should knee pain be checked by a professional?

Seek qualified medical or cycling advice if pain persists, worsens, or causes swelling. Check both knees, not only the painful one. Stop there.

Conclusion

Knee pain while cycling often comes from a saddle that is too high, too low, or poorly positioned. If you are wondering, “How to adjust my bike seat to avoid knee pain?”, begin by setting the saddle height so your knee remains slightly bent when the pedal reaches its lowest point. This allows comfortable leg extension without forcing your hips to rock. Next, check that your knees track naturally over your feet and pedals, then adjust the saddle forward or backward to support a balanced reach and stable joint position.

A small change in saddle tilt can also improve comfort, but avoid extreme angles that place pressure on your hands or hips. Pay attention to smooth pedaling, straight leg alignment, and moderate resistance rather than pushing heavily in a difficult gear. Test one adjustment at a time during a short, easy ride, and fine-tune gradually. Stop if pain continues, worsens, or affects your normal movement, and seek professional medical advice when necessary.

Madeline

Madeline

Madeline is a dedicated marketing professional with a wealth of expertise in our company's core offerings. With a keen understanding of the industry, she brings a unique perspective to her role, consistently delivering high-quality content that highlights the superior aspects of our products. As......